
I have tried to make the MRIcron main window as useful but simple as possible. While the options may appear confusing at first, I hope over time the software feels intuitive.
A sample window is shown below. You can get a similar view by launching the software, choosing File/OpenTemplates/ch2bet to load the background image (shown as a grayscale brain) and then choosing Overlay/Add and opening the image \Template\attention.
the controls on the tool bar offer quick access to the main tools for brain imaging. The X/Y/Z numbers set the slice to view (X refers to Left/Right, Y to anterior/posterior and Z to superior/inferior). Adjusting these values will change the sagittal, coronal and axial slice displayed. The next item is the zoom-factor. Here images are scaled 'to fit' - e.g. each view of the brain is strecthed to fill its panel optimally. Alternatively, you could choose x1 (100%), x2 (200%) or x3 (300%) zoom factors. The next series of buttons refer to the active layer (more on layers in the next section). In the example below, the currently active layer is image 'attention', and this image is being shown as a red gradient with a minimum value of 1.96 to 4. In this example, attention is a statistical Z-score map that has been placed on top of the background image of a brain. Statistical values less than 1.96 are not shown, with the darkest value set to 4.
Layers
When you use the File menu's Open command (Open, Open recent and Open Templates) you are selecting a background image. What makes MRIcron powerful is its ability to load multiple layers of images. To add additional images on top of your background, simply choose 'Add' from the 'Overlay' menu. For example, launch MRIcron and choose 'File\Open templates\ch2bet', then choose 'Overlay/Add' and select the 'attention.nii.gz' image from the 'Example' folder that (typically, this folder is installed in C:\program files\mricron\examples). Now you should see a brain activation statistical map on top of the background anatomical image. Note that overlay images are scaled to map on top of the background image. You can adjust the appearance of each layer by using the layer panel:
Note that you can click on the leftmost button in the overlay panel to select between the open layers - for example the image above shows settings for the 'Background' image, as well as the overlay image named 'saccades'. Note that the image intensity range for the background is from 45 to 120, using a grayscale color scheme. This means that values of 45 or lower will appear as complete black, and 120 and above will be white, with intermediate intensities appearing as a corresponding gray value. There is also an icon with a color scale and the number zero: this allows you to have the color range set from zero, even if your threshold is greater than zero: for example our statistical map 'saccades' is set to show values from 2.3 to 6: values less than 2.3 will not be shown. However, since the 'color range from zero' button is depressed, a T-score of 2.3 will appear as a dark red (as 2.3 is part way between 0 and 6) instead of a black (if the color range was from 2.3 to 6).
Note that the 'Overlay' menu also allows you to modify how layers appear. For example, on image 'A' below, I have selected Overlay/TransparencyOnBackground/0%[Opaque], while for image B, I have set the transparency to 50%. Also note that you can load multiple overlays simultaneously. For example, images C and D below show the 'attention' and 'saccades' files both overlayed on top of ch2bet - with attention shown in green and the saccades shown as red. For image C, I have set the Overlay/TransparencyOnOtherOverlays/50%, while for Figure D this has been set to 'Additive' (so regions with both red and green appear yellow).

| From MRIcron's main window you can select Window/Render to view a volume rendering of your data. You can change the vieiwing angle of the image by adjusting the Aizmuth and Elevation values. The Background menu allows you to adjust therendering of the background image, while the background menu allows you to determine how overlays will appear. Of critical importance, the Overlay/SearchDepth will adjust whether the rendering shows superficial overlays (e.g. a settings of 4 will only look within the first 4 voxels of the background image [e.g. within the first 4mm if your background image hasa 1mm resoultion), while a setting of 'infinite' will show an overlay regardless of its depth. Also criticial is the Background/BehindOverlay menu item - if checked, the software will only start looking for overlays that exist behind the surface of the background. On the other hand, if this value, overlays will not be constrained by the background image (e.g. you will be able to view an overlay that is closer than the background). You can save your preferred settings by selecting File/SaveSettings. This information will be saved in the 'render' folder, and you will be able to select them by choosing File/OpenSettings. |  This image shows a sample rendering. You can view this image by running the fmri.bat file that is included with MRIcron. |
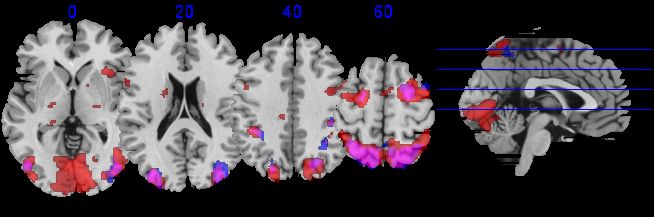
From MRIcron's main window you can select Window/Multislice to see the multislice window. You will then be shown a series of slices of the currently open volumes. Within the Multislice form you can use the View meanu to adjust settings - e.g. to select whether you want to see sagittal, coronal or axial images, and to choose the desired slices and overlap between neighboring slices. You can also choose File/SaveSettings to save your favorite views (previous sets will be listed under File/OpenSettings).
Linux x86 32bit GTK1 Note that it is easier to install the GTK2 version (see below) with recent (>2005) distributions of Linux.
- Download the software.
- Unzip the software (for modern Linux systems, right click on the file mricronlx.zip and choose to 'extract here').
- Open a terminal window.
- Change to the folder where you installed mricron, e.g. cd ~/mricron
- Launch mricron by typing ./mricron (note you must be in the same folder as the mricron executable.
- You can also run the example .bat files, for example ./xfmri.bat shows two statistical maps on top of a high resolution anatomical scan.
- In case you receive error messages, check if all the dependencies of the program are installed. In particular, you need
- GTK 1.2 (this is called GTK+ by some distributions, and gtk by others)
- libgdk_lixbuf2.0
- You can see a complete list of .so files needed by the software using the command:
ldd ./mricron - In case you cannot run the program and it displays a message saying it cannot find one of these libraries (you must run the program from the command line to see error messages), you need to download and install a package for the necessary library:
- On RPM-based distributions you can find packages here: http://rpm.pbone.net/
- On Debian-based distributions you can find packages here: http://www.debian.org/distrib/packages
Linux x86 32bit GTK2 Note that the GTK1 version (above) has been more extensively tested.
- Download the software.
- Unzip the software (for modern Linux systems, right click on the file mricronlx2.zip and choose to 'extract here').
- Double-click on the mricron application icon to launch the program.
Linux x86 64bit GTK1
- Download the software.
- Unzip the software (for modern Linux systems, right click on the file mricronx641.zip and choose to 'extract here').
- Double-click on the mricron application icon to launch the program.
Linux x86 64bit GTK2
- Download the software.
- Unzip the software (for modern Linux systems, right click on the file mricronx642.zip and choose to 'extract here').
- Double-click on the mricron application icon to launch the program.
Linux Debian GTK2
- MRIcron has been added to the Neuor Debian packages.

Custom Search

If you liked this article, subscribe to the feed by clicking the image below to keep informed about new contents of the blog:


0 commenti:
Post a Comment