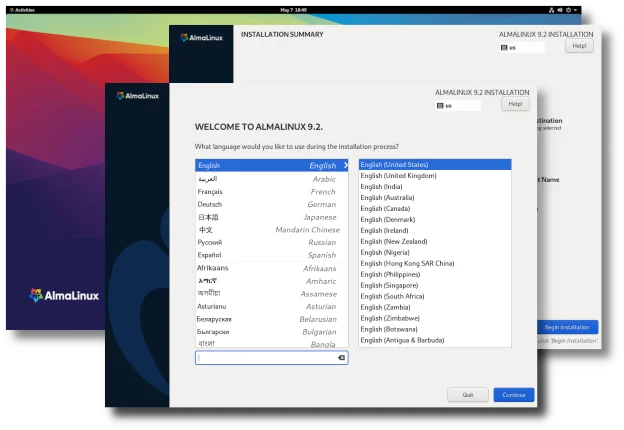
Below is a practical beginner-to-intermediate guide to downloading, installing, configuring, and using AlmaLinux. I’ll focus on a normal physical PC/server, with notes for virtual machines where relevant.
As of September 2026, AlmaLinux10 is the current major release line; the official documentation provides Boot, Minimal, and DVD installation images for supported architectures. AAlmaLinux Wiki
1. What is AlmaLinux?
AlmaLinux OS is a free, open-source enterprise Linux distribution designed to be compatible with the Red Hat Enterprise Linux ecosystem.
It is commonly used for:
-
Servers and web hosting
-
Development environments
-
Databases
-
Virtualization
-
Containers
-
Network services
-
Desktop/workstation use
-
Learning enterprise Linux administration
If you're familiar with CentOS or RHEL, AlmaLinux will feel very familiar. Its package manager is DNF, services are generally managed with systemd, networking with NetworkManager, and security commonly involves SELinux and firewalld.
2. Check your computer
For a typical x86-64 PC/server, make sure you have:
-
A 64-bit Intel/AMD processor
-
At least 1.5 GB RAM; 4 GB+ is much more comfortable
-
At least 10 GB disk space; 20 GB+ is recommended
-
An 8 GB or larger USB flash drive for physical installation
-
Internet access, particularly if using the Boot ISO
AlmaLinux also supports ARM64, IBM Power, and IBM Z architectures. AAlmaLinux Wiki
Important: Installing AlmaLinux onto a disk can erase existing data. Back up anything important before proceeding.
3. Download AlmaLinux
Use the official AlmaLinux download resources:
AlmaLinux Installation Guide
There are three main installation ISO types:
ISO
Best for
Boot
Small installer; downloads packages from the Internet
Minimal
Minimal offline installation
DVD
Large, mostly self-contained installation image
For a first installation, I'd generally use the DVD ISO if you have sufficient bandwidth/storage, or Boot ISO if you have a reliable Internet connection. The official documentation describes all three. AAlmaLinux Wiki+1
For a normal Intel/AMD computer, choose x86_64.
4. Verify the ISO
Don't skip this on a server or important computer.
AlmaLinux publishes cryptographic checksums and GPG signatures. For example:
sha256sum AlmaLinux-10.2-x86_64-dvd.iso
Compare the resulting SHA-256 value with the official CHECKSUM file.
You can also verify the signature:
gpg --import RPM-GPG-KEY-AlmaLinux-10
gpg --verify CHECKSUM
The official AlmaLinux instructions demonstrate both GPG signature verification and SHA-256 verification. AAlmaLinux Wiki
This protects you against using a corrupted or tampered ISO.
5. Create a bootable USB
Windows
A common method is Rufus.
-
Insert an empty USB drive.
-
Start Rufus.
-
Select your USB drive.
-
Select the AlmaLinux ISO.
-
Start the writing process.
-
Confirm that the USB can be erased.
The AlmaLinux installation documentation specifically describes Rufus as an option for Windows. AAlmaLinux Wiki
Linux
First identify the USB:
lsblk
Suppose the USB is /dev/sdb.
Be extremely careful here. Using the wrong device will destroy the data on that disk.
Then:
sudo dd if=AlmaLinux-10.2-x86_64-dvd.iso \
    of=/dev/sdb \
    bs=4M \
    status=progress \
    conv=fsync
Use the whole device, such as /dev/sdb, rather than a partition such as /dev/sdb1.
The official documentation also recommends lsblk/fdisk for identifying the USB and dd for writing the image. AAlmaLinux Wiki
6. Boot the computer from the USB
Insert the USB and restart the computer.
Open your computer's boot menu. Depending on the manufacturer, this is often:
-
F12 -
F11 -
F9 -
Esc -
Del
Select the USB device.
You should see the AlmaLinux installer menu.
If offered, Test this media & install AlmaLinux is a useful choice because it checks the installation media before starting the installer. AAlmaLinux Wiki
7. Configure the installer
AlmaLinux uses the Anaconda installer.
You'll eventually reach the Installation Summary screen.
Language
Choose your preferred language.
For an English-language server, for example:
English → English (United States)
Keyboard
Choose the appropriate keyboard layout.
Time and date
Select your:
-
Region
-
City/time zone
Enable network time synchronization.
For Argentina, for example, you'd normally select:
America/Argentina/Buenos_Aires
Network and hostname
Make sure the correct network interface is enabled.
For a server, give the machine a meaningful hostname, such as:
web01.example.com
You can change it later with:
sudo hostnamectl set-hostname web01.example.com
AlmaLinux's official post-installation guide documents both nmtui and hostnamectl for network/hostname configuration. AAlmaLinux Wiki
8. Choose the software environment
You'll normally encounter choices such as:
-
Minimal Install
-
Server
-
Server with GUI
-
Workstation
-
Virtualization Host
-
Custom Operating System
For a server, I recommend starting with:
Minimal Install
or:
Server
For a desktop PC, choose:
Workstation
A minimal installation reduces unnecessary software and is particularly useful for servers.
9. Configure the disk
This is one of the most important steps.
For a new computer where AlmaLinux will use the entire disk, Automatic partitioning is easiest.
For example:
/dev/nvme0n1
└── AlmaLinux
If you need a custom layout, you can choose Custom.
A traditional server might use:
/boot
/
/home
/var
swap
Modern installations commonly use LVM and may use a layout such as:
/boot
LVM
 ├── root
 └── swap
AlmaLinux also provides disk encryption through the installer. The official installation guide describes both automatic/custom partitioning and encryption. AAlmaLinux Wiki
For a beginner
Use:
Automatic partitioning
unless you have a specific reason to manually partition the disk.
10. Create your user account
Create a normal user, for example:
Username: alice
Give the user a strong password.
If this is your administrative account, enable:
Make this user administrator
You can then perform administrative operations with:
sudo command
For example:
sudo dnf update
rather than working permanently as root.
11. Set the root password
You can set a root password during installation.
For everyday administration, however, use your normal account plus sudo.
For example:
sudo dnf update
sudo systemctl restart sshd
sudo reboot
This is preferable to logging in as root for ordinary work.
12. Begin the installation
Review the configuration.
Once everything is correct:
Begin Installation
The installer will copy the operating system to the disk.
When finished:
-
Reboot.
-
Remove the USB drive.
-
Boot from the internal disk.
You should now see the AlmaLinux login screen.
13. First login
Log in with the user you created.
Open a terminal and check the system:
cat /etc/os-release
You can also use:
hostnamectl
and:
uname -r
For example:
NAME="AlmaLinux"
VERSION="10.x"
14. Update the system
This should be one of your first actions:
sudo dnf update
Or:
sudo dnf upgrade
Then reboot if the update requires it:
sudo reboot
AlmaLinux's official post-installation documentation recommends updating the system after installation and also documents dnf --security update for checking/installing security updates specifically. AAlmaLinux Wiki
15. Learn DNF
dnf is one of the most important commands in AlmaLinux.
Search for software
dnf search nginx
Install software
sudo dnf install nginx
Remove software
sudo dnf remove nginx
Update everything
sudo dnf update
See installed packages
dnf list installed
Find information about a package
dnf info nginx
Find available packages
dnf list available
A typical workflow therefore looks like:
sudo dnf update
sudo dnf install nginx
16. Learn systemctl
AlmaLinux uses systemd to manage services.
For example, after installing nginx:
sudo systemctl start nginx
Check its status:
systemctl status nginx
Start it automatically when the machine boots:
sudo systemctl enable nginx
Do both at once:
sudo systemctl enable --now nginx
Stop it:
sudo systemctl stop nginx
Restart it:
sudo systemctl restart nginx
17. Configure networking
On a graphical installation, you can normally configure networking through the desktop settings.
On a server without a GUI, use:
nmtui
This gives you a text-based network configuration interface.
You can inspect interfaces with:
ip addr
And NetworkManager connections with:
nmcli connection show
The official AlmaLinux post-installation documentation recommends nmtui for systems without a graphical interface. AAlmaLinux Wiki
18. Configure the hostname
Check it:
hostnamectl
Set it:
sudo hostnamectl set-hostname server01.example.com
Verify:
hostname
19. Configure the firewall
AlmaLinux uses firewalld for firewall management.
Check its status:
sudo firewall-cmd --state
The official documentation notes that firewalld is enabled by default on AlmaLinux installations where applicable. AAlmaLinux Wiki
List allowed services:
sudo firewall-cmd --list-services
For example, to permit HTTP:
sudo firewall-cmd --permanent --add-service=http
sudo firewall-cmd --reload
For HTTPS:
sudo firewall-cmd --permanent --add-service=https
sudo firewall-cmd --reload
Then:
sudo firewall-cmd --list-services
Don't simply disable the firewall
Avoid doing this:
sudo systemctl disable --now firewalld
unless you have a specific reason and understand the consequences.
It's generally better to allow only the services you actually need.
20. Learn SELinux
One of the biggest differences newcomers encounter is SELinux.
Check its status:
getenforce
Typical output:
Enforcing
Check more information:
sestatus
Don't immediately disable SELinux because an application produces an error.
Instead, investigate the SELinux denial and configure the system appropriately.
SELinux is an important part of the security model used by the RHEL-family distributions.
21. Install SSH
For a server, SSH is usually essential.
Install the server if necessary:
sudo dnf install openssh-server
Enable it:
sudo systemctl enable --now sshd
Check:
systemctl status sshd
Allow SSH through firewalld:
sudo firewall-cmd --permanent --add-service=ssh
sudo firewall-cmd --reload
Then from another computer:
ssh alice@192.168.1.100
Replace the username and IP address with yours.
22. Find your IP address
Run:
ip addr
or:
hostname -I
For example:
192.168.1.100
You can then connect to the machine remotely:
ssh alice@192.168.1.100
23. Install useful basic tools
A fresh installation may benefit from some standard utilities:
sudo dnf install \
    vim \
    nano \
    wget \
    curl \
    git \
    tar \
    unzip \
    zip \
    rsync \
    bash-completion \
    tmux
You don't need all of these, but they're useful for administration and development.
24. Learn basic Linux commands
These are worth learning first:
pwd
Show your current directory.
ls
List files.
cd /path
Change directory.
mkdir test
Create a directory.
cp file1 file2
Copy a file.
mv file1 file2
Move/rename a file.
rm file
Delete a file.
cat file
Display a file.
less file
Read a large file.
grep "text" file
Search within a file.
find /path -name "*.log"
Find files.
25. Monitor the system
Useful commands include:
top
or:
htop
For disk space:
df -h
For memory:
free -h
For disks:
lsblk
For CPU/kernel information:
lscpu
uname -a
For system logs:
journalctl
For a particular service:
journalctl -u sshd
Follow logs live:
journalctl -u sshd -f
26. Install a desktop environment
If you installed AlmaLinux as a minimal/server system but later want a graphical desktop, AlmaLinux documents installing desktop environments through DNF package groups. For example, GNOME can be installed through the Server with GUI or Workstation groups. AAlmaLinux Wiki
You can inspect available groups:
sudo dnf group list
Then, depending on your AlmaLinux release and available groups, install the desired environment.
For example:
sudo dnf groupinstall "Server with GUI"
For a normal desktop computer, though, it's usually easier to install AlmaLinux initially with the Workstation environment.
27. Install applications
The basic pattern is:
sudo dnf install PACKAGE
Examples:
sudo dnf install git
sudo dnf install python3
sudo dnf install nginx
sudo dnf install mariadb-server
After installing a server application, you'll generally need to:
-
Configure it.
-
Start its service.
-
Enable it at boot.
-
Configure SELinux if necessary.
-
Open the required firewall ports.
-
Test it.
For example:
sudo dnf install nginx
sudo systemctl enable --now nginx
sudo firewall-cmd --permanent --add-service=http
sudo firewall-cmd --reload
28. A good first-day configuration
For a new AlmaLinux server, I'd work through this sequence:
# Update
sudo dnf update

# Identify the system
hostnamectl
ip addr
lsblk

# Set hostname if necessary
sudo hostnamectl set-hostname server01.example.com

# Install useful tools
sudo dnf install vim curl wget git tmux rsync

# Check firewall
sudo firewall-cmd --state

# Check SELinux
getenforce
sestatus

# Check services
systemctl --type=service --state=running

# Check disk
df -h

# Check memory
free -h

# Check logs
journalctl -p warning..alert
Then configure SSH, backups, firewall rules, applications, and monitoring according to what the server will actually do.
29. AlmaLinux as a desktop
If you're using AlmaLinux on a personal computer rather than a server, the workflow is simpler:
Install AlmaLinux Workstation
        ↓
Connect to Wi-Fi/Ethernet
        ↓
Run system updates
        ↓
Configure language/time/keyboard
        ↓
Install applications
        ↓
Configure printers/audio/graphics if necessary
        ↓
Create backups
The official AlmaLinux project also provides Live Media, including desktop-oriented images such as XFCE, which can be useful for trying AlmaLinux before installing it. AAlmaLinux Wiki
30. If you're completely new to Linux
I'd learn AlmaLinux in this order:
Search for software
-
Terminal basics
-
Files and directories
-
Users, groups, and permissions
-
sudo -
DNF/package management
-
systemctl -
Networking and
nmcli -
SSH
-
Firewalld
-
SELinux
-
Logs with
journalctl -
Storage/LVM
-
Bash scripting
-
Backups
-
Server applications
The official AlmaLinux documentation has a broader System Series covering subjects such as firewalld, NVIDIA drivers, multimedia, logging, and time synchronization. AAlmaLinux Wiki
Quick reference
Task
Command
Update system
sudo dnf update
Install package
sudo dnf install package
Remove package
sudo dnf remove package
Search packages
dnf search name
Start service
sudo systemctl start service
Enable service
sudo systemctl enable service
Enable + start
sudo systemctl enable --now service
Service status
systemctl status service
IP address
ip addr
Network configuration
nmtui
Hostname
hostnamectl
Firewall status
firewall-cmd --state
Firewall rules
firewall-cmd --list-all
SELinux status
sestatus
Disk space
df -h
Memory
free -h
Disks
lsblk
Logs
journalctl
Reboot
sudo reboot
Shut down
sudo poweroff
Recommended starting point: download the current AlmaLinux 10 x86_64 DVD ISO, verify it, create a bootable USB, install using automatic partitioning and the Workstation environment if this is a desktop—or Minimal/Server if it's a server. Then update the system and learn dnf, systemctl, networking, firewalld, and SELinux.



0 commenti:
Post a Comment