 Aura tool is a desktop background setter, capable of:
- picking image randomly from specified paths;
skipping too small images and images with too different aspect rate;
rescaling it in a clever ways (crop solid margins, resize with cubic, then liquid rescale algorithm) to fit the desktop with as little quality loss as possible;
labelling images (that is, rendering the label in the corner) using embedded tags;
daemonizing to pick new image on a time-basis or when triggered (by SIGHUP or cli);
keeping track of used images, blacklisting.
Intended usage is to point it to the path(s) with random image collection(s) and let it adjust any suitable ones to the current screen size. It has no gui and no capabilities to dowload images from anywhere.
Quick links
- Sourceforge project page
- File releases (aka "Downloads")
- github repository
- Discussion page - any questions / feedback are welcome
- Bug / issue tracker for anything that will go wrong
How it works
Main process is actually very simple, to the extent that it's written in bash (which has negligible memory footprint), but the main magic is in the image processing part.
All the wallpaper-setters I've seen doesn't seem to consider this part important enough, focusing instead on providing GUI and image fetching mechanisms, but if you have a local collection and don't need guis, they're usually not much better than feh or ten-liner python script.
To see what I mean, let's take a simple case of a laptop screen (1366x768) and an image (960x660):

As you can see, image and screen aspect ratios don't match and the screen resolution is totally different (larger).
What all setters seem to do is either resize the image, crop it, or a combination of these.
Results, in this case, as you can probably guess, are not particulary good:


Each of the above has obvious flaws - it's either cropped, scaled in a weird way and/or has solid margins.
What this tool produces (automatically, from any random image, without any interaction), is this:

Click the images to see detailed versions, and note that details and their proportions are magically preserved by the grace of liblqr (liquid rescale implementation).
To see all the intermediate steps in more detail, let's get back to image one:
Obviously, image can be at least cropped out of solid margins (yet none of existing tools seem to care), but if you'll load it into GIMP and use autocrop, it won't really change anything, because (surprise!) margins are not solid at all: they usually have the noise or some minor texture, as a matter of fact, so you'd have to do the fuzzy-solid cropping, at least.
And the tool does that, no problem. Actual technique I've used was to create a simple mask-layer, adjust it's contrast and use solid-crop feature to determine the cropped margins, then just use the same values on the original layer.

It certainly is better, but still in no way fits nicely to 16:9 screen with larger resolution, and this is the point where LQR (liquid resizing aka seam carving) algorithm comes into play.
LQR drops/scales the most featureless parts of an image, so all the important parts could be left untouched.
I highly recommend to spend a minute or two to skim over this YouTube video, showing what the algorithm is capable of and explaining how it does that. You'll probably never look at the usual Cubic and Sinc the same way again ;)

As you can see, black leftovers at the bottom magically disappeared, leaving the original label intact, which is a superior result than can be produced with simple matrix interpolations.
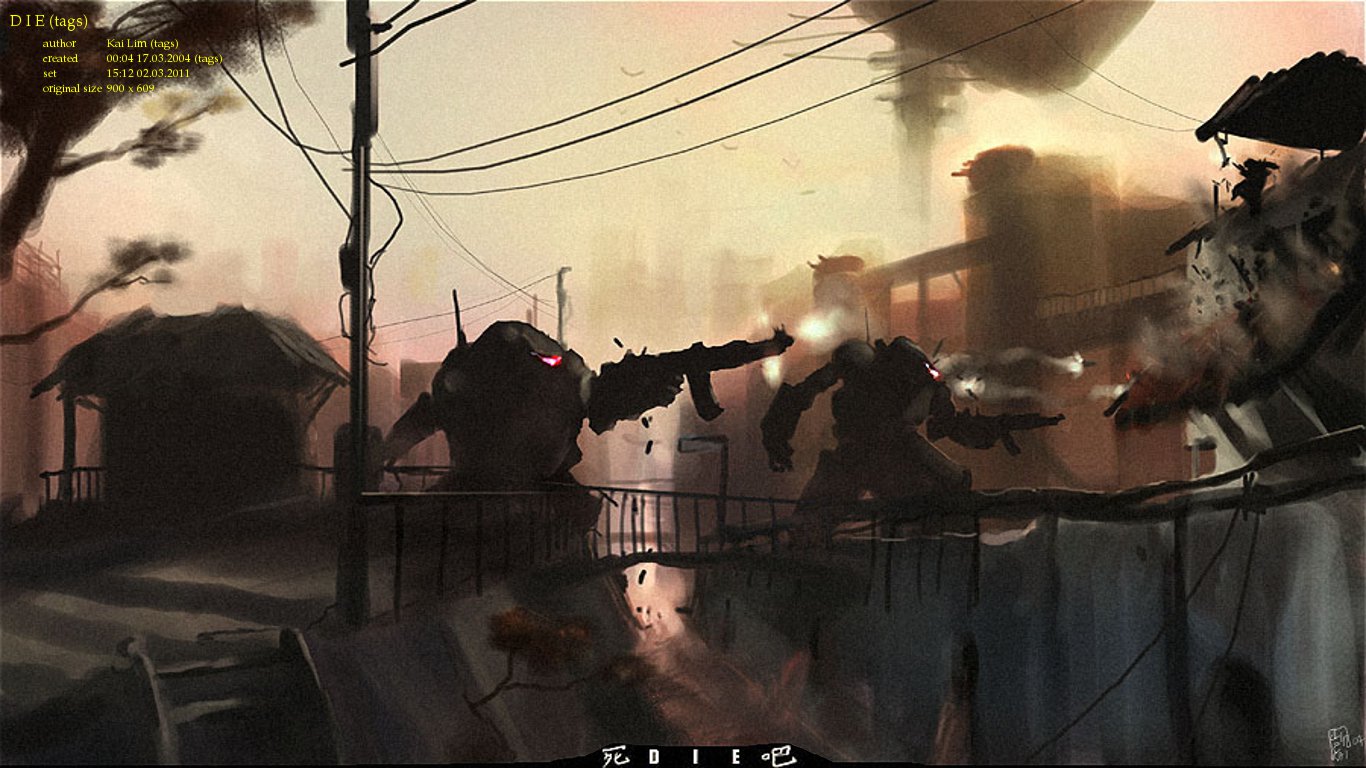
Since most of my images come from the sites like DeviantArt (I actually aggregate interesting (to me) channels from there to this feed), which make it easy to track authors, most time when I see really cool artwork, I like to know who made it and if there's more of such awesomeness (and there usually is!).
So a filename is a nice thing to see, at least. Author name could be there, you can maybe look up an image by it, if it really corresponds to image title in an obvious way.
But most images also come with an embedded tags, like EXIF or XMP, and all the info like author and title is there in the sane state, so these are used in the label if present in a file, overriding filename/mtime defaults:
Note that label color is a bit of PITA and not quite easy to get right reliably.
Tool calculates label size, takes the average color in the area where it'll be rendered and picks the most different (Delta E, CIEDE2000 algorithm) color from the predefined set of a brightest ones.
Produced image is stored to "/tmp/.lqr_wpset_bg.*.png" (can be changed in lqr_wpset head) and then set as a background using either python gconf interface (for gnome), xfconf (xfce) via dbus interface or just by drawing it to an X root window via pygtk. To set background on modern KDE, use scripted image wallpaper plugin with a simple shell script, containing just "echo /tmp/.lqr_wpset_bg.*.png" line (note no quotes, so shell will expand the asterisk).
So far, results don't make me flinch in disgust at horribly-mangled images, but if there's a room for improvement, guess I'll spot it over time, and will certainly appreciate any suggestions, since I don't really work with graphics at all, and may not know even some basic concepts every artist and designer are probably aware of.
Installation
While "aura" script is pure bash, all image manipulations are performed from a python script ("lqr_wpset.py") using gimp's python-fu.
Thus, some stuff must be installed for the tool to work:
- bash
- python (2.6 or 2.7, not 3.X)
- (2.X series, haven't tested with/ported to gi)
- gimp (2.6, 2.7 or later, with python plugins support)
- gimp-lqr-plugin
Everything aside from gimp-lqr-plugin is probably present in any decent desktop linux system.
Optional stuff (will be used if available):
- xprintidle tool (debian mirror, hosts sources as well) - to cycle images only when system is not idle (1h threshold, by default).
- pyexiv2 python module - to use information from EXIF/XMP/IDC tags in labels.
- colormath python module - to pick the most contrast color for label using CIEDE2000 (simplier algorithm will be used otherwise).
These are probably best to get using the package manager, but colormath can be installed with a simple "easy_install colormath" or "pip colormath" command.
Project files can be downloaded from this page, just one latest .tar.gz will do. Tarball can be extracted with regular double-click from some GUI (like GNOME Nautilus shell, KDE Dolphin, XFCE Thunar, etc), tapping enter on it inside midnight commander or typing "tar xf /path/to/aura-X.Y.tar.gz" in some shell. Inside there are two files beside the ubiquitous "README" - "lqr_wpset.py" and "aura".
Actual "installation" is needed for the gimp plugin (lqr_wpset.py), which should be put into one of gimp plugin directories, like "~/.gimp-2.6/plug-ins/" (other option is usually "/usr/lib/gimp/2.0/plug-ins", but your mileage may vary across distros, read the docs here or there if in doubt) and be marked as executable. Here's what I mean:
mkdir -p ~/.gimp-2.6/plug-ins/
cp lqr_wpset.py ~/.gimp-2.6/plug-ins/
chmod +x ~/.gimp-2.6/plug-ins/lqr_wpset.py
Bash script itself ("aura") will work from any path, just run it.
Usage
To quote the command itself:
~% aura -h
Usage:
aura paths...
aura ( -d | --daemon ) [ --no-fork ] paths...
aura [ -n | --next ] [ -b | --blacklist ] [ -k | --kill ] [ -h | --help ]

Set background image, randomly selected from the specified paths.

Optional --daemon flag starts instance in the background (unless --no-fork is
also specified), and picks a new image every 10800s afterwards.

Some options (or their one-letter equivalents) can be given instead of paths to
control already-running instance (started with --daemon flag):
--next       cycle to then next background immediately.
--blacklist  add current background to blacklist (skip it from now on).
--kill       stop currently running instance.
--current    echo current background image name
--help       this text

Various paths and parameters are specified in the beginning of this script.
...and mentioned "beginning of this script" is:
~% head -17 aura
#!/bin/bash

## Options
interval=$(( 3 * 3600 )) # 3h
recheck=$(( 3600 )) # 1h
activity_timeout=$(( 30 * 60 )) # 30min
max_log_size=$(( 1024 * 1024 )) # 1M, current+last files are kept

gimp_cmd="nice ionice -c3 gimp"

wps_dir=~/.aura
blacklist="$wps_dir"/blacklist
log_err="$wps_dir"/picker.log
log_hist="$wps_dir"/history.log
log_curr="$wps_dir"/current
pid="$wps_dir"/picker.pid
Also, see the beginning of a python plugin (lqr_wpset) for some image processing options:
max_aspect_diff = 0.7 # 16/9 - 4/3 = 0.444
max_smaller_diff = 3 # don't process images N times smaller by area (w*h)
min_prescale_diff = 0.3 # use cubic on larger images (preserving aspect), then lqr
label_offset = 10, 10
label_colors = [0]*3, [255]*3, (255, 0, 0),\
(0, 255, 0), (0, 0, 255), (255, 255, 0), (0, 255, 255) # most contrast one will be chosen
font_filename = 'URW Palladio L Medium', 16
font_timestamp = 'URW Palladio L Medium', 11

# Asterisk will be replaced by temporary id for created images
# All files matching the pattern will be a subject to cleanup!
result_path = '/tmp/.lqr_wpset_bg.*.png'
Not that there should be any need to change this stuff, but if there is - it's just a shell/python.
I just put something like "aura -d ~/media/picz" into my ~/.xinitrc.


Custom Search
If you liked this article, subscribe to the feed by clicking the image below to keep informed about new contents of the blog:


0 commenti:
Post a Comment